Pages

Monday, 10 December 2012

Beaded Bag 3 and Pay if Forward

So, another update on the beaded bag... I've not posted for ages, but I've not done anything to my bag for ages either; I'm catching up on what I've done over the past month or so!


So, I've moved on from beading around the sparkles, to filling in the spaces in between, and I have branched out and tried a new stitch... boucle stitch.  It is essentially a lot of little picots, so it adds amazing texture.  Yes, it uses more beads, and is going to make the handbag exceptionally heavy, but I think you'll agree it's worth it!

This is the first shot which actually gives you an idea of what the finished bag will look like.  Full of sparkles, fresh-water pearls, and other shiny bits and pieces.  I've now decided that I won't be having flowers on my wedding day, and this is going to be in their place.

On to the Pay it Forward...
On the blog of a very good friend, she offered the chance for three lucky people to receive a handmade gift from her in the next 365 days, on the condition that they offered people the same chance, either on their blog or facebook.  I was lucky enough to be one of the three... so I am giving you the chance to receive something handmade from me.  The first three people to comment on this post saying they would like to take part in this will be the recipients.   


The handmade thing doesn't have to be jewellery, it could be a handmade card, a painting or sketch, a cake... anything really, as long as it's made by you!


Tuesday, 23 October 2012

Beaded Bag Part 2

So, it's been a couple of weeks since I posted the progress on my beaded bag... I have made a bit of progress!

First off, I've removed one of the chatons that I had initially attached... I just didn't like the way it looked.  I knew that I wanted to make the rest of the chatons stick up less from the surface of the bag... so I have developed a new way of beading them!  Instead of making a quick bezel for the chaton, and sewing it onto the backing, I've started doing more beading around them, then sewing the whole component on.

This component is an 8mm chaton, surrounded by several rows of circular peyote, then a ring of 4mm bicones, in 4 different shades of white and crystal... then a few rows of embroidery in gilt-lined opal.


This is possibly my favourite component on the whole bag... a 12mm rivoli , with a ring of 3mm bicones in rose-water opal around the edge of it


This element is super-sparkly, surrounded by antique rose swarovski bicones, with little gold size 15s highlighting the end of the crystals.


A light-colarado topaz chaton is at the centre of this element, with plenty of rose-water opal bicones surrounding the circular peyote piece holding the chaton in place.

The chaton in this piece is surrounded by tiny 2mm pearls and dusky pink size 11s.  Somehow, it looks to be spiraling out from the centre of the chaton, which I really like.


These are the remaining sparkles that I have left to attach to the backing, two of them have already been beaded around, but the others have yet to be started.


I did go on a little sparkle-buying splurge, and bough some more crystals to go on the bag - two pale gold swarovski pearl cabs, some 24k gold plated fire-polish crystals, and some 3mm crystals in rose-water opal and crystal AB.  This bag is going to be so bling by the time I finish with it!


This is my current progress... I really need to get going with it - every time  look at it, I realise just how much beading there is to do between the sparkles!


Tuesday, 2 October 2012

Beaded bag part 1

At the moment, I am planning my wedding. I'm lead to believe it's quite a stressful thing to do... 

We would like our wedding to be as quirky as us, and part of that is basing it on a handmade theme. We would like as much as possible to be handmade and individual, preferably made by us, or people we care about.


One thing I decided I would like to make for the wedding is a small beaded clutch bag to keep my essentials in... such as my asthma inhaler.  I've never made anything like this before, and I've certainly never attempted a project this big.  I thought it would feel daunting, but I'm so excited about it, I'm enjoying it without feeling worried about the scale of it.


I've seen some bead embroidered bags before on the internet, and from what I can work out, they've been based on an existing bag. The way I'm making mine is to use a plastic mesh bag frame as the base. I've drawn the shape out on some blackout curtain lining, and I am embroidering onto that.


The first step was to decide on a rough design for the bag... I knew I wanted it to be mainly white, but with hints of gold and pale pink. I also knew I wanted a lot of sparkle in it, so I put together a selection of swarovski rivolis and chatons in crystal, crystal AB, rose-water opal and light colarado topaz. I scattered these over the bag template and shifted them around until I had a distribution I was happy with... and then I marked which stone went where.


I've started beading bezels around the swarovski stones, then sewing them onto the backing and embroidering around them.
I am so excited with the progress so far... but I know there is a very long way to go.  I will keep updating photos on this so you can see the progress.


Wednesday, 1 August 2012

OTTBS Bead, Blog & Bounce - Bead Romantique

I am a member of a facebook group dedicated to 'tackling that bead stash', and we are set regular challenges throughout the year.  Recently, we've started something new... each month, a popular beading book is selected, and we make something from it, then publish it on our blogs, along with a review of the book.

The first 'Bead, Blog & Bounce' is for Bead Romantique, by Lisa Kan.  This wasn't a book I owned, but I was so taken by pictures of things fellow beaders had made, that I decided to buy it... but to mix things up, I bought the 'e-book' version.  


There was one piece in the book that really caught my eye, but there was no way I could afford to make it... for a start, it required 500 3mm Swarovski crystals!!  But the triple spiral lariat was just so beautiful! I decided to mix things up a little, and combine part of the design from the lariat, with something a little less flamboyant (and expensive), so I took the rope design from the Deco Collar, and made a bangle, and embellished it with the leaves and flowers from the Triple Spiral Lariat.  This is what I managed to come up with:


So, the other part of the challenge was to do a mini-review of the book.  Let me just say, I loved this book!  I think the reason I didn't already have it in my stash was the name... I'm never convinced by things professing to be 'romantic'!

It does however have lots of beautiful pieces in it, all very feminine and wearable, which is not something you always find.  The instructions are all very clear, and very well written, with excellent diagrams.  There is a real variety of pieces in the book too - something for every level.

I am very glad to have added this book to my stash, and there are many more designs that I will be adding to my to do list in the future!

Links to the OTTBS blog, and the blogs of other beaders taking part in the Bead, Blog and Bounce...


Operation Tackle That Bead Stash

(I will add other blog links here shortly)

Wednesday, 25 July 2012

A little less creative

Instead of showing you what I've been making recently, I thought I'd explain a little about why I haven't been making things...


I suffer from depression.... it's not something I'm ashamed of.  I was diagnosed over 4 years ago.  About 2 years ago I had a terrible relapse, and I've been on medication ever since.


As time has gone on, I've got happier. My life has changed radically, I've changed job, moved house twice, moved half-way across the county once, and met, and got engaged to the most wonderful man.  


Several months ago, under the supervision of my GP, I decided to see if it was time for me to come off my anti-depressants.  It wasn't a decision I rushed to, but unless you try these things, you never know if you can cope without the pills.

So... I reduced my dose by 25%, and took that for a month, then I reduced by another 25% and took that for a month.  I was really proud of my progress.... and 5 weeks ago, I reduced by 25% again, so now taking a quarter of the medication I was.... and I've not been feeling too great.  I didn't want to get out of bed in the morning, I didn't have the energy and enthusiasm to go out and enjoy life... and most tragically of all, I didn't have the urge to create.  It's horrible.  I am now back taking a higher dose, and I'm feeling more of my sparkle return.  I even started some beading last night.

I am putting this out there so people can see that there is nothing to be ashamed of when it comes to depression.  If it was any other organ that was imbalanced, people would have no issues talking about it or taking medication to help... but because it's the brain, there is a stigma attached to it by some people.


I am not proud of the fact that I suffer from depression, but I do not hide the fact.  At the moment, I need medication to help me with my daily life, but that won't always be the case.  Pretty soon, I'll be back to my usual self, beading, crocheting, designing... and having fun.

Sunday, 8 July 2012

Playing with Spikes Part 2

I've been playing with spikes again... I recently went on holiday, and took a small box of beads with me... some 15s, some 11s and some delicas, and 12 spike beads. My aim was to bead myself a dodecahedron, with spikes all over it.  An element of maths was required to work out how the elements would join together, but it wasn't too taxing for a holiday.


I was very pleased with the result, and even more pleased when it was described by one of my friends as "very Laura McCabe"!


I have written this up as a tutorial, which is available from my Etsy store.


Earlier in the year, I blogged about going on Laura McCabe's beaded sculpture masterclass, which I attended the week after I got back from my holiday.  I was very proud to take these little spiky balls with me to the class, and Laura liked them too!  I'll blog about the masterclass itself another time.


Sunday, 13 May 2012

Playing with Spikes

I've not blogged for ages... sorry.  I've not had a great deal to say for myself as I've had to put a lot of effort into my day job over the last few months.  But recently, I've put a lot of time into my beading again.  What I have to share with you tonight is a little experiment.  I recently bought some spike beads, in two different sizes, and I decided to sit down and play with the baby spikes this evening.


These baby spikes are 5mm x 7mm, and they are coloured 'Magic Lilac'. The spikes I actually used in my beading were Magic Orchid, and had slightly more green to them,  but they're just a beautiful.  


I had a pack of six of them, so making a six-sided shape was the obvious choice. 


Initially, I started out small, but realised that that wasn't going to work, and that the spikes needed to have a fair number of beads around them if I was going to join them in a way that gave a strong structure; so the bezelling began!  I started off with a ring of size 15s, then increased to 11s around each of the six spikes, then joined them using size 8s.  I must admit, I didn't manage to do it quite in the way I had planned, but that was mostly to do with the bead-count.  It turned out that I prefer the way I 'botched'!
The corners needed reinforcing to strengthen up the structure, and then I had 12 threads to weave in (yawn!).


I'm very happy with the finished result.  A good beading friend of mine made my day by describing it as 'very Laura McCabe'.  I couldn't have been happier as I'm going on Laura's beaded sculpture master-class in a months time... I'm still nervous about it, but I'm sure it'll be great fun!

So, this is my little spiky ball of beads.... no idea what I'll do with it; it'll probably be added to my pile of 'beady somethings' on my desk.


Tuesday, 21 February 2012

Beaded birdie!

My last post was about a little robin I had embroidered... this is only a short one, but after the really positive feedback I got on the Robin, I thought I'd try something a little different, and bead a blue tit instead.  For those of you who aren't native to the UK, blue tits are tiny little birds, which are rather partial to peanuts, and can be found in British gardens.


In a fit of craziness, I decided to bead it in size 15 beads, they're about 1.2mm  across, so they're REALLY small.  


I was very pleased with the shape of my blue tit... I am totally rubbish at drawing, so the fact that the shape I drew actually looks like a bird, and was actually recognisable as a blue tit was a real triumph!  


So, without further ado, here is my little beaded blue tit!  I hope you like him as much as I do.  I will be wearing him to work tomorrow - I turned him into a broach.

Monday, 13 February 2012

Little Robin Red-Breast

I admit it... I'm a doodler!  
Especially during meetings.  Usually, I draw all kinds of geometric things, but during a teleconference a couple of weeks ago, I drew a little bird on a green post-it.  Then I was struck with inspiration... this would make a really nice design for a bead embroidered robin!


I'm still relatively new to bead embroidery, I've only made a few pieces in the past, so this felt like it was quite ambitious to me.  I spend a couple of weeks thinking about it, and on Sunday evening, I decided to give it a go!

The ladies of my favourite facebook group gave my little Robin such a friendly welcome into the world, that I thought I'd write up how I made him (ok, so I had kind of planned to do this any way, hence all the step-by-step photos!)  At points, I got carried away, and forgot to stop to take photos... so if things jump about a bit... I apologise.
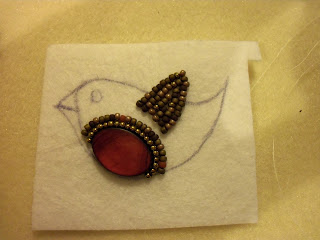
First off, I drew the outline of the bird onto my stiff-stuff, and glued the 17 x 10 mm black cherry mother of pearl oval in place, and in back-stitch, I sewed a row of metallic bronze size 11 beads around the oval.  

Next, I started on the wing.  I used a mix of matt and metallic finish beads in shades of brown, red and gold iris, working along the outline of the wing, then building up inside the wing to fill it in.  I've heard this described as 'painting with beads' and I think that's a beautiful description!


 The next step was to start filling in the body of the bird.  I really wanted to do this in a way that would give an idea of the the different parts of the bird... like I wanted the wing to look different to the body, and I wanted the tail to look like a tail, so this is how I built it up, initially by back-stitching another row around the shell oval.

 And then a third row, so the body met the wing.
 I then moved on to the tail, working in back stitch, two beads at a time

 Next, I decided to move to the head, and used a 3mm petrol Swarovski pearl for the eye, and  copper-lined crystal size 15 delicas for the beak
 I then continued to bead the outline of the head, and fill in the rest of the empty space.  There were a few little spaces where the size 11 beads didn't quite fit together as nicely as I would have liked, mainly because the rows were all worked in different directions, so I filled these in with some size 15 seed beads in light brown AB.
 Once the beading was finished, I trimmed around the beadwork leaving a very tiny edge of stiff-stuff all the way around.
 The next bit actually gave me a headache... but that was due to the smell of the glue!  E6000 is a favourite of bead embroiderers, but it really smells... I used it to glue the embroidery onto some ultra-suede backing.  I then cut around the beadwork, leaving about 1mm of ultra-suede all the way around the edge.
 Then, to finish it all off nicely, I used the size 15 light brown AB beads to sew a brick-stitch edge all the way round.

I am going to turn this into a hair clip... or a brooch... I'm not sure which.  I think I'd wear it more as a hair clip.

A member of the facebook group I mentioned earlier suggested that I tried making some other British birds... which led to a great deal of hilarity.... and a conversation which I shan't repeat on here.

I'd like to say a big thank you to all the lovely ladies from OTTBS who have really made my evening, and who make beading, and tacking my stash great fun!


Wednesday, 1 February 2012

What I've been up to this month!

Well, January has been a busy month... hence the lack of blogging.  
There has been a bit of beading (possibly not as much as usual), but in with all the usual stuff (like work), I moved house too!
I've moved from this lovely terraced house in Swindon....
To this lovely (but rather cold) flat in Tidworth...

It is quite a change (especially in temperature), but I've done it for a good reason.  Towards the end of last year, I changed jobs, and ended up with a commute of just over an hour each way.  Although I had friends in Swindon, I just wasn't happy with the driving, and it was making me tired and run down... hence the move!

So, whilst moving, beading got pushed to the bottom of the priority list for a while... and I got behind on my earring challenge (I've challenged myself to make a pair of earrings a week for the whole of 2012); but since settling in I've dedicated some time to catch up!

Here are my January Earrings... 4 pairs of earrings, some simple, some sparkly, three different types of technique.

 Bead embroidery earrings for week one... (my first finished piece of bead embroidery)

 Super sparkly earrings - the tutorial was given to me as a gift by the uber-talented designer Ella Des (her tutorials are for sale in her Etsy shop  I was very pleased with these as they are totally out of my colour comfort zone, but I absolutely love them!

 These are my quickie wire work earrings... I found these buttons in a shop in Swindon called SewCraft.  I fell in love with them (along with some other buttons I bought at the time), and these just just spoke of simple elegance to me.

And these are the last pair of January earrings... the Satellite bead is designed by Heather Collin, and can be found in her ArtFire shop

I've been working on a few other pieces - the bangle from the cover of bead and button magazine (still a work in progress)

And a Tila bangle designed by Debbie van Tonder - her tutorial is available in her Etsy shop.

Let's see what February has to offer (except for my birthday!).


Sunday, 8 January 2012

Am I good enough?

I have been a beader for just over 4 years now, and I have to say, I am completely hooked... I'm a bead addict. I love the way that the little seed beads fit together to make so many different shapes, and how all the different stitches feel, and how they work together.  Up until now, I have been a self-taught beader - learning from books, tutorials, the internet etc.  I even class myself as a novice designer - coming up with a few original designs of my own - I've even sold a few tutorials online, and had one of my designs published in a magazine.

The more I bead, the more I want to get into designing properly, and I want to start taking some classes, and more than anything, I'd like to meet some other beaders!

There are some pro beaders out there that I really admire, I am even honoured enough to have a few of them as 'friends' on facebook.  One beader whose work I admire a lot is Laura McCabe, she is renowned for her seed-beading around rivolis, highly faceted Swarovski crystals.  Rivolis have no holes, they have a flat-ish front, and a pointed back.  They have such depth to them, and they come in an amazing array of colours, shapes and sizes, they are truly stunning.  The reason I'm talking about Laura McCabe today is that I am contemplating taking one of her 'master-class' classes, designing and making beaded sculpture - it's being taught at Stitchncraft, in Dorset, which will become one of my local bead shops when I move later this month.

There were two things putting me off going to this work shop... the first is a lame reason - I didn't really want to go on my own, and the second is what this blog is about - am I good enough?

Regarding going on my own, I now know two people from one of the groups I belong to on facebook who are going, so I won't be on my own, but the second bothers me more.  To help me decide if I am good enough, I've bought one of Laura's tutorials - to make the ultimate beaded bead.  I've found some vintage square rivolis online, and ordered them... pretty much everything else is going to come from my stash...


This is what the ultimate beaded bead looks like - photo courtesy of Laura McCabes website.

Mine will not be this colour - it will be a multitude of greys and blacks, with several different bead finishes.  If I find I get on with this pattern, and can follow it, then I'll book the workshop... I'll blog with my progress, as I'm sure it'll take me a while to make - especially as I'm going to be moving house in a few weeks!

Saturday, 7 January 2012

OTTBS Beaded Earring Challenge (week 1)

I belong to a beading group on facebook, and several of us have accepted the challenge to make a pair of earrings a week - for the whole of 2012... I must be mad... but if I stick to it, I'll have 52 new pairs of earrings by the end of the year! 


No idea what on earth I am going to do with 52 pairs of earrings... hopefully sell some of them!


Following on from my last blog post about learning bead embroidery, I though I'd give myself an embroidery challenge for the first week.  So, I sat down with some stiff stiff, some blue mountain jade, some size 11 and 15 seed beads and a bit of ultra-suede and went for it!


So, here they are... my embroidered earrings.


One down... 51 to go!

Monday, 2 January 2012

Learning Bead Embroidery

This year, I have made two new years resolutions... the first is to learn bead embroidery, the second is to write more tutorials (and particularly, to finish the two I have had on the go for bloomin' ages!).

But bead embroidery is the theme today... it's something I've admired for a long time, but never had the courage to give it a try.  Thanks to some gentle persuasion from a very good beady friend, I've taken the plunge!  I didn't need to add much to my stash to get going with this... just some Stiff Stuff, some glue, and some ultra-suede.  Thanks to a de-stash sale on Etsy, I managed to buy enough ultra-suede to last a life-time for $5, and I bought some Stiff Stuff from RB Beads.  I already have a glue gun, although I'm not sure how suitable it is for this purpose, but it'll do for the while... I've also invested in some tacky-glue, which seems to work pretty nicely too!.

So, on to my first attempt.  I decided to keep it pretty free-form, and bead around a small chrysocolla cab, and add some 4mm semi-precious beads in too.
Nancy, my bead embroidery mentor, suggested that I add another row of 11s around the outside to make it easier to finish off, which I did, and finishing off something so wiggly would have been difficult!

Finishing off was something that I couldn't get my head around until after Christmas.  My boyfriend and sister bought me books on bead embroidery.  I got The Art of Bead Embroidery: Technique, Design & Inspiration by Heidi Kummli and Sherry Serafini, and Bead Embroidery by Yukiko Ogura. (My other sister bought me the Bead & Button Right-Angle-Weave Stitch Workshop book... but I'll leave that for another day!)  The books are very different, as they focus on quite different techniques.  The first, is written from two different points of view - each showing how they work certain techniques, and what materials etc they use.  It's full of project ideas from each author, and has a totally inspirational gallery at the back.  The second focuses on individual stitch techniques, showing how to make flowers, leaves, different lines, raised, textured bead work etc.  Both books are beautiful, and I am very grateful to have received them... I just need to find the time to play with all the techniques, and the inspiration to make beautiful things with the techniques.

Do any of you readers do bead embroidery?  I'm curious to find out any hints and tips etc, Is it better to embroider on stiff stuff or ultra-suede?  Ultra-suede feels very floppy - should I use an embroidery frame to keep it tight when I'm sewing?

I'm full of so many questions about this beautiful art - I suppose the only real way to answer them is to dive right in, and have a good old play!  Wish me luck!