Pages

Showing posts with label Free pattern. Show all posts

Friday, 19 April 2024

Scintilla Necklace

I think it'd be fair to admit that I'm a nerd, or maybe a geek. I spent nearly 8 years at university studying chemistry, so some of that geekiness inevitably sneaks out into me beading occasionally. This time it's the name of the design that's geeky. Scintillating is something that is sparkly or shining brightly, but it came to my mind because of scintillation counters which measure ionising radiation. I'll just leave a wiki link here before I lose you all! 
Back to the beads! 
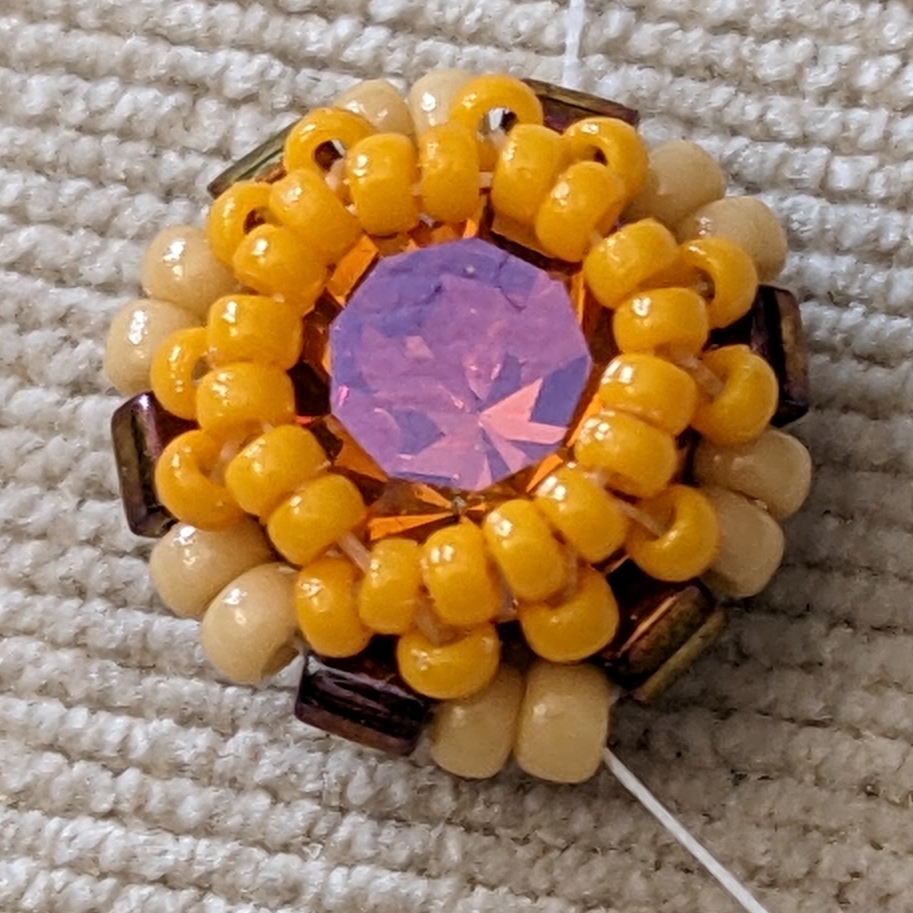
These bezels are designed to be sparkly above all else. The crystal bicones make up the majority of the bezel, which is pretty unusual, there are a few seed beads at the back for stability... And then just a chain to turn them into a necklace. 

This bezelled chatons doesn't have to be used in a necklace, nor does it have to be clear crystals - I've made some earrings using this bezel before, and I love them. Check out the picture at the bottom of the page for the earrings. But you could use a row of these bezelled chatons as a bracelet, or add a few here and there throughout some beadwork for some sparkle.  

What you will need to make this: 

A. Size 15  Miyuki seed beads (silver) 2g)
B. 3mm crystal bicones (80)
C. 4mm crystal bicones (89)
D. Size 11 Miyuki seed beads (3g)
E. ss39 (8mm) chatons (10)
F. 30cm of chain + clasp and jump rings


Anything else? 
Bead mat, beading needle (my favourite is Miyuki needles), thread (I strongly recommend fireline for this as there are so many crystals), scissors or a thread zap, pliers for opening and closing jump rings. 


1.
    Pick up 1(A),1(B) 8 times (total 16 beads). Go through all of these beads again and tie into a circle. Go through a couple of beads in the circle so that your thread is exiting a (B) bead.


2.    Pick up 1(C), 1(D) and go back through the (C) bead again. Skip the (A) bead in the circle and go through the next (B) in the circle. This adds the bicone as a little fringe.


3.    Repeat step 2 around the circle adding a total of 8(C) beads. Step up by exiting the (D) bead added in step 2.

4.    Pick up 1(D), pass through the (D) on the tip of the next crystal around on the circle. Repeat this until you have added a total of 8(D) beads and the circle is closed, go through the first (D) bead added in this step. Place your chaton into the centre of the circle, flat side down and pull the thread tight to close the circle.


5.    Pick up 1(D), go through the next 2(D) beads added in step 4. Do not go through any of the (D) beads from step 3. Repeat this three more times until you have added a total of 4(D) beads. Step up by going through the first (D) added in this step.


6.    Pick up 1(A), go through 1(D). Repeat 3 more times until you have added a total of 4(1). Sew through all 8 beads used in this step again to reinforce the thread path, then weave in, tie off and cut your threads. Repeat steps 1-6 until you have 10 bezelled chatons.


7.    With a new length of thread, weave and tie into one chaton and exit from one of (C) beads, facing towards the front of the bezel. Pick up 1(C) and go through a (C) on another bezel from front to back. Pick up 3(D) and go though the (C) on the first bezel. Leave an 8 inch tail thread as we will use this later.

8.    Pick up 1(A) and go through the connecting (C), pick up 1(A) and go through the (C) on the second chaton. Repeat this thread path without adding any beads, then step up by going through the (D) on the back of the (C) bead of the second bezel.


9.    To move across to the correct place to add the next bezelled chaton, we are going to add (D) beads between the (D) beads added in step 3. *Pick up 1(D), go through (D)* Repeat between * 3 times. Step up by going through the (C) bead toward the front of the bezel.

10. Repeat steps 7-9 until all 10 chatons are joined.


11. Move to the correct place to add your loop to connect your chain: *Pick up 1(D), go through (D)* Repeat between * 3 times. Go through the (C) and pick up 7(D). Go back through the (C) to make a loop. Repeat this thread path several times to strengthen it. Weave in, tie off and cut your thread. Repeat this step at the opposite end of your necklace using the tail thread.


12.
 Using a jump ring, attach your chain to your (D)bead loops at each end of your necklace. If required, add the claps to your chain using jump-rings. 


I made this pair of earrings using the bezel for this necklace, they work beautifully - I used opal chatons and opal ABx2 bicones for as much sparkle as possible. 
       

      I'd love to see what you make using this design - feel free to tag me in your pictures on Instagram @BeadsByBecs or using the hashtag #BeadsByBecs

Tuesday, 16 April 2024

Daffodil Necklace Tutorial

Although this necklace sings about spring and daffodils, you don't have to make this in spring colours. Use some classic blacks, gold and silver and you'll have a stunning necklace that looks like stars rather than daffodils!


What will you need to make this necklace:

A. Half tila beads (6 per flower) 
B. Size 11 seed beads 3g
C. Size 15 seed beads 1g
D. ss39 (8mm) chaton (1 per flower)
E. 3mm fire polish beads (2)
F. 4mm bicones (12)
G. Miyuki 6mm sender bugles (8) 
H. Kite bead (2)
I. Length of chain, jump rings and a clasp

Anything else? 
Beading mat, beading needle - I use Miyuki needles, beading thread (I like 4lb fireline, especially as this
project has crystals and bugles in it), scissors or a threadzap, pliers for opening and closing jump rings.

To make the necklace you need three flowers, but these little daffodil flowers (or stars if you make them in different colours) would make fabulous earrings - just thread a jump ring through one of the petals and then attach that to an ear wire. 

1.    Pick up 6(A) and tie into a circle. Go through the first (A) again.

2.    Pick up 1(B), go through the next (A), repeat five more times adding a total of 6 (A) beads. Step up by going through the top (unused) hole in the (A) bead your thread is exiting.


3.    Pick up 2(A), go through the top hole in the next (A) bead. Repeat five more times adding a total of six lots of 2(A) bead. Step up so that your thread is exiting from the top hole of an (A) bead.


4.    Pick up 3(C) beads, go back through the hole in the (A) bead and through the next 2(B) beads. Repeat five more times adding a total of six groups of 3(C) beads. Step up by exiting from the middle (C) bead from the last group added.


5.    Pick up 2(C) beads and go through the middle (C) bead in the next group of 3 around. Repeat five more times adding a total of six groups of 2(C) beads. Keep the thread tension loose and pop the chaton in – pointy side down. Tighten the thread and repeat the thread path to tighten. Step up by working through your beadwork to exit from one of the pairs of 2(B) beads between the half-tilas.


6.    Pick up 3(B), and go through the next 2(B) beads, skipping the (A) bead. Repeat this five more times, adding a total of six groups of 3(B) beads. Step up by exiting from the first (B) bead added at the beginning of this step.


7.    Pick up 3(B), skip 1(B) and go down through the third (B) from step 6. Repeat this five more times, adding a total of six groups of 3(B) beads. Weave in and tie off the threads. Repeat steps 1-7 to make 3  flowers – leaving a long working thread attached to the last flower to construct the rest of the necklace.


8.    With your thread exiting from the middle bead of one petal, pick up 1(E), 1(F), 1(B), 2(F), 1(B), 1(F). Thread back through 1(F), 1(B), 1(F) to form a loop, pick up 1(E) and then go through the middle (B) of one petal on a second flower. Weave through 14 (B) beads on the second flower so that your thread is exiting the middle (B) bead of the next but one petal (see diagram).


9.    Pick up 1(E), 1(F), 1(B), 2(F), 1(B), 1(F). Thread back through 1(F), 1(B), 1(F) to form a loop, pick up 1(E) and then go through the middle (B) of one petal on a third flower. Go back through 1(E), 1(F), 1(B), 1(F), 1(E), the 15(B) beads in the bottom petals of middle flower 1(E), 1(F), 1(B), 1(F), 1(E) and 15(B) in the bottom of the first flower.


10. We will make the loop to add the chain: Pick up 1(B), 1(F), 1(B), 11(C), go back down through 1(B), pick up 1(F), 1(B) and go through the middle (B) on the next petal.


11. Go through 15(B) along the top of the first flower, pick up 1(G), go through the 1(C) in the group of crystals between the flowers, pick up 1(G), go through the middle (B) in the petal on the second flower, opposite. Repeat this to add a pair of (G) beads between the second and third flowers and weave through the petals on the top of the third flower so that your thread is exiting the (B) bead marked with an arrow.


12. We will make the loop to add the chain: Pick up 1(B), 1(F), 1(B), 11(C), go back down through 1(B), pick up 1(F), 1(B) and go through the middle (B) on the next petal. Step up so that your thread is exiting from the (B) bead marked with an arrow.


13. Pick up 1(C), 1(G), 1(C), 1(H)- through the narrow end, 1(C), 1(G), 1(C). Pass through the middle (B) in the top petal of the middle flower. Pick up 1(C), 1(G), 1(C), 1(H)- through the narrow end, 1(C), 1(G), 1(C) and pass through the middle (B) in top petal of the first flower.


14. Make a half-hitch knot and bead back through the middle (B) of the top petal (changing the direction you are beading in) and bead through 6(B) beads, exiting from the (B) before the middle (B) of a petal. Pick up 2(B), go through the bottom hole of the (H) bead, pick up 2(B). Bead through the middle flower to exit from the opposite petal, pick up 2(B), go through the bottom hole of the (H) bead, pick up 2(B) and go through the (B) next to the middle (B) of the petal on the third flower. Weave in and trim your thread ends.


15. Add a length of chain and a clasp to each end of your beadwork. Adding 7.5” of chain on each end should give an necklace approximately 18” in length.


I'd love to see what you make using this design - feel free to tag me in your pictures on Instagram @BeadsByBecs or using the hashtag #BeadsByBecs


Sunday, 1 November 2020

 It's been an age since I last blogged, and I though that I should start again... to keep you all updated with what's going on in my beady little mind. 

Firstly, lockdown has been really tough on my creativity and except for a couple of Zoom classes I took, I stopped beading altogether!

Moving house seemed to bring my creativity back though, so I'm back to beading, designing and enjoying myself. 

I thought I'd share a little free tutorial with you all for some beaded beads made from pinch beads.  They're cute little beaded beads and make pretty earrings. 

Materials:
To make one beaded bead

15 pinch beads

5 size 11 beads

Beading thread - I usually use fireline, but KO or OneG  beading threads or similar in colours that match your beads will work just as well. 

Scissors or thread zap

Beading mat


Step 1


Pick up 3 pinch beads and tie them into a circle.  Thread through the next pinch bead in the circle.


Step 2


Pick up two pinch beads, and thread through the bead your thread is exiting from to make another triangle.  Thread through the two beads just added.


Step 3


Pick up 2 pinch beads, and pass through the bead your thread is coming out from to create a triangle.  Go through the first pinch bead added in this step.


Step 4


Pick up two pinch beads, and thread through the bead your thread is exiting from to make another triangle.  Thread through the two beads just added.


Step 5


Thread through the bead marked with an arrow, pick up one pinch bead, and then thread through the bead your thread was exiting at the start of this step.  Keep threading through bead until your thread is coming out of one of the side beads (shown with an arrow).


Step 6


Pick up two pinch beads and go through the bead the thread was exiting at the beginning of this step.  Go through the first pinch bead again.

Note – The beads from this step onwards are purple to make it easier to see what to do.


Step 7


Pick up one pinch bead, go round through one of the side beads, back towards the beads already added in step 6 – following the arrows in the diagram, so you are exiting the next side bead around.

Follow the numbers on the arrows to show the thread path.

Step 8

Pick up one pinch bead, go down the next pinch bead, through the side bead, then up the pinch bead just added – see the arrows and follow the numbers to see the thread path.


Step 9


Pick up one pinch bead, go along through a side bead, up a pinch bead, and down through the pinch bead just added (follow the arrows and numbers to show the thread path).
Step 10


This step finished off the pinch beads… without picking up any beads, go through the side bead, up a pinch bead, down the next pinch bead, and back through the side bead.


Step 11


Now to embellish the side of the bead… pick up one size 11 seed bead, pass through the next side pinch bead.  Repeat this all the way around the bead.  Weave the thread through the beads to get to the start, tie the ends together and trim the threads.

I hope you've enjoyed making these little beaded beads. If you've given them a go, please leave me a message below - I'd love to hear what you think. 

Happy Beading! 

Tuesday, 3 September 2013

Free Pattern - playing with pinch beads

Last week, I ordered some pinch beads... I'd not seen them before, and I thought they looked interesting!

The first thing I did with them was have a bit of a play... I came up with a cute little design for a beaded bead.


If you'd like to have a go at making your own pinch bead beaded bead, I've written up the pattern and published it as a free tutorial on craftsy. 

Saturday, 27 April 2013

Friday Flower Freebie!

Yesterday was Friday... and I was struck by some inspiration after work on how to make a herringbone bezel for a chaton, and turn it into a flower.  I'm in a generous mood too, so I thought I'd write it up on here as a free pattern, rather than put it up for sale in my Etsy store.  There are plenty of other patterns/tutorials in my Etsy store if you feel like having a look though!


To make a Friday Flower, you will need... an 8mm chaton (ss39), and seed beads in sizes 11 and 15 (just a gram or so of each), plus beading thread, needle and scissors.

Start off with about a metre of thread, thread the needle and pick up 10 size 11 seed beads (called A beads from here on in).  Go through all the beads again to make a circle, and then the next 2 A beads to close the circle nicely.


Pick up 2xA then go through the next two A beads in the ring. This is the start of a stack of herringbone.


Repeat for a total of 5 times to make 5 herringbone stacks, and step up through the first bead added in the step above.


Pick up 2xA, go down through the next bead.  These beads will sit in a pair above the start of your first herringbone stack.


Pick up one size 15 seed bead (a B bead), and go up through the first bead of the next herringbone stack.


Repeat all the way around, making herringbone stacks with A beads, and B beads between the stacks.  Step up at the end so that your thread is exiting from the top of your herringbone stack.


Pick up 2xA, and go down through the next bead in the herringbone stack - this stack will now be three pairs of beads tall (not including the beads from the original circle of beads).


Pick up 2xB, go up through the next A bead on the next herringbone stack round.


Repeat this all the way around - adding 2xA onto the stacks and putting 2xB between the stacks.  Pull this round quite tight, and your beadwork will begin to form a cup-shape.


Step up at the end of this round, but instead of exiting the top bead of a herringbone stack, come out of the second bead down.


Pick up 2xB and go through the next bead in the herringbone stack, but still working on the second level, i.e. NOT the top bead.

Go through the pair of B beads between the stacks, and out of the second level A bead in the next stack.


Repeat the above step all the way around the beadwork, and step up with your thread coming out of the first B bead added.


Pop your chaton in the beadwork,make sure it is sitting straight, and that the top edges are BELOW your pairs of B beads added in the previous step.


Pick up one B, and go down through the next B to make a little picot shape.


Pick up 2xB and go up through the next B bead.  Pull your thread tight - it is this round that will hold your chaton in place.


Repeat the above two steps all the way around, pulling tight a you go.  Make sure your chaton is sitting straight in your bezel as you work your way around - as you can see here, mine is a little wonky. Step up into an A bead at the top of the herringbone stack.


Pick up 7xA and go down through the next bead on the NEXT herringbone stack.  Step up by going UP the next bead in the same stack.


Repeat adding petals of 7xA beads around the bezel.  Step up at the end of the round by going up through the first bead of the first petal.


Next, use peyote stitch to work around the petal.  Pick up 1xA, miss 1A, and go through 1A.  Repeat this for a total of three times.  Work your way around to the next petal.


Repeat around the flower.  Step up so that your thread is exiting from the first A bead added in the first petal.


Finish off the petal by picking up 1xB bead, go through the next A bead.  Pick up 3xB, go through the next A.  Pick up 3xB, go through the next A.  Pick up 1xB, go through the next A. Step up into the next petal by going through the first A bead of the next petal.


Repeat all the way around the flower, then weave in your thread ends and trim them off.


I'd love to hear what you think of this little pattern, and what you make with your flowers!  You're welcome to sell anything you make using this pattern, but please do not reproduce the pattern or teach it.  Please credit me (Becs Dean) as the designer, or give a link to my blog.